In this post, I will show how to automate the process to Pause and Resume an Azure SQL Data Warehouse instance in Azure Data Factory v2 to reduce cost. I am assuming that you already know how to provision an Azure SQL Data Warehouse, Azure Logic Apps and Azure Data Factory V2.
Before deep dive on how to, let’s have a quick overview of what is Azure Data Factory (ADF), Azure SQL Data Warehouse (SQL DW) and Azure Logic Apps.

Azure SQL DW is a cloud-based data store used to process and store petabytes of data and it is built on MPP (Massively Parallel Process) architecture. Azure SQL DW is key component of Microsoft Big Data offering. It is important to highlight that Azure SQL DW is not built for operational workloads (OLTP).
Azure Data Factory is a cloud-based data orchestration built to process complex big data using extract-transform-load (ETL), extract-load-transform (ELT) and Data Integration solutions. I will use Azure Data Factory V2, please make sure you select V2 when you provision your ADF instance.
Azure Logic Apps is a cloud base solution that helps you build, schedule, and automate processes as workflows so you can integrate apps, data, systems, and services across enterprises or organizations. I will use Azure Logic Apps to Resume, Pause and check Azure SQL DW State.
Setup an Azure SQL DW
Resource Group Name: Blog
Azure SQL Server: azuresqlsrv-zenatti
Azure SQL DW database: sqldw
Tier: 100
Azure SQL DW APIs
I will use the following Azure SQL DW APIs:
Resume (POST): https://management.azure.com/subscriptions/{subscription-id}/resourceGroups/{resource-group-name}/providers/Microsoft.Sql/servers/{server-name}/databases/{database-name}/resume?api-version=2014-04-01-preview HTTP/1.1
Pause (POST): https://management.azure.com/subscriptions/{subscription-id}/resourceGroups/{resource-group-name}/providers/Microsoft.Sql/servers/{server-name}/databases/{database-name}/pause?api-version=2014-04-01-preview HTTP/1.1
Check State (GET): https://management.azure.com/subscriptions/{subscription-id}/resourceGroups/{resource-group-name}/providers/Microsoft.Sql/servers/{server-name}/databases/{database-name}?api-version=2014-04-01 HTTP/1.1
In the APIs above, you will need to type your subscription id, resource group name, server name and database name. See below how should be:
Service Principal and SQL Server Access
Before setup and configuring Logic Apps, you need to create a Service Principal (Client Id and Client Secret), please follow the steps from: https://docs.microsoft.com/en-us/azure/azure-resource-manager/resource-group-create-service-principal-portal
After creating and save the Client Id and Client Secret, you need to give access to the Client Id to access Azure SQL Server, as below:
- Click over SQL Server

- Click on Access Control (IAM) and Add

- Select Role as SQL Server Contributor, Type Client Id on Select field and Save.

Configuring Logic Apps
In the Azure Logic Apps, I will use Azure SQL DW REST API to Resume, Pause and check Azure SQL DW State. You need to create three Logic Apps as below:

Logic-App-SQL-DW-Resume
- Create a Logic App “Logic-App-SQL-DW-Resume”
- Open Logic App Designer and Select “When a HTTP request is received”

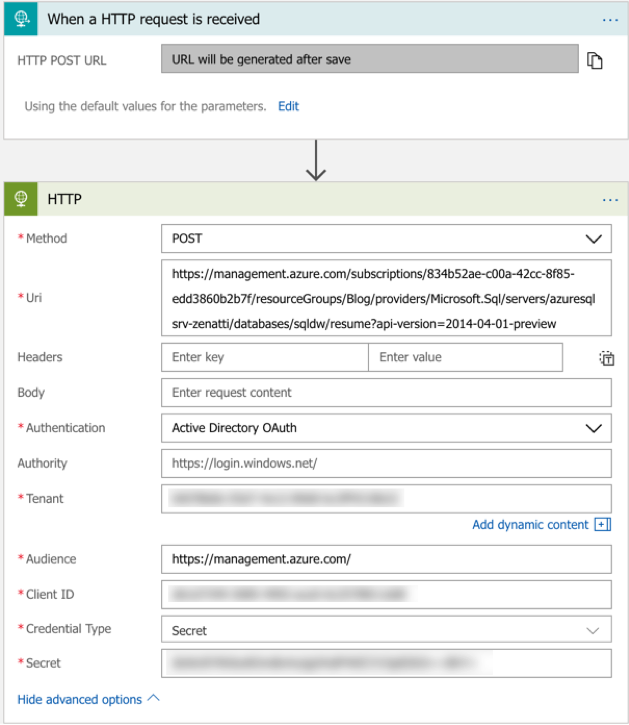
- Add an Action HTTP and enter the following:
- Method: POST
- Uri: <enter the SQL DW API to Resume>
- Authentication: Active Directory OAuth
- Tenant: <Tenant Id – See below how to get Tenant Id>
- Audience: https://management.azure.com/
- Client ID: <Client Id>
- Credential Type: Secret
- Secret: <Client Secret>
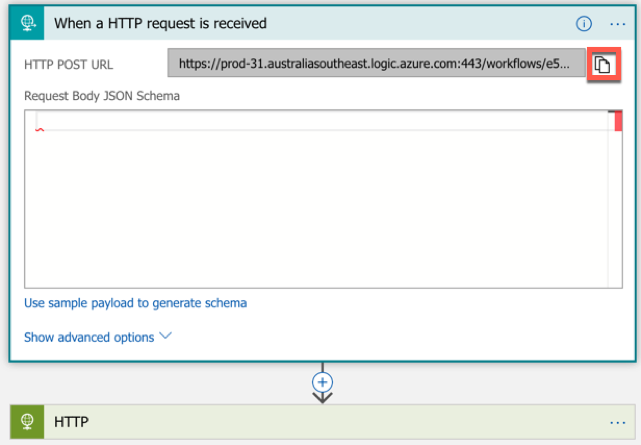
- Save and Click on Run to test it, you should get a successful run as below:

- Copy the URL for the Logic App and save to use in the ADF Pipeline
Logic-App-SQL-DW-Pause
- Create a Logic App “Logic-App-SQL-DW-Pause”
- Open Logic App Designer and Select “When a HTTP request is received”

- Add an Action HTTP and enter the following:
- Method: POST
- Uri: <enter the SQL DW API to Pause>
- Authentication: Active Directory OAuth
- Tenant: <Tenant Id – See below how to get Tenant Id>
- Audience: https://management.azure.com/
- Client ID: <Client Id>
- Credential Type: Secret
- Secret: <Client Secret>

- Save and Click in Run to test it, you should get a successful run as below:

- Copy the URL for the Logic App and save to use in the ADF Pipeline

Logic-App-SQL-DW-State
- Create a Logic App “Logic-App-SQL-DW-State”
- Open Logic App Designer and Select “When a HTTP request is received”

- Change Method to GET
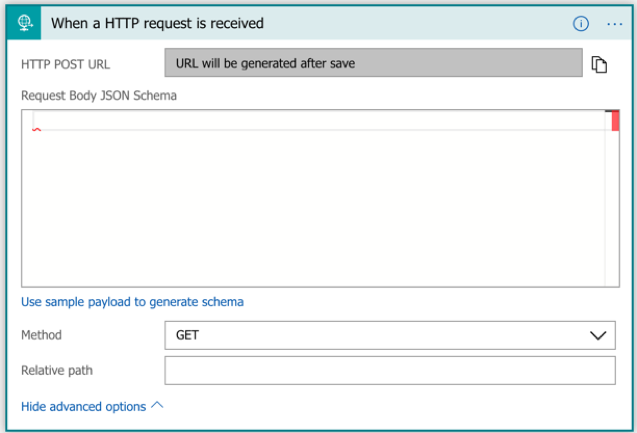
- Add an Action HTTP and enter the following:
- Method: GET
- Uri: <enter the SQL DW API to check SQL DW State>
- Authentication: Active Directory OAuth
- Tenant: <Tenant Id – See below how to get Tenant Id>
- Audience: https://management.azure.com/
- Client ID: <Client Id>
- Credential Type: Secret
- Secret: <Client Secret>

- Add an Action “Request – Response”. Add Status code and Body as below:

- Save and Click in Run to test it, you should get a successful run as below:

- Copy the URL for the Logic App and save to use in the ADF Pipeline

Build ADF Pipeline
Provision an Azure Data Factory V2.
SQL DW Resume
Create a Pipeline and name it as “SQL DW Resume” and follow steps below:
- Create 2 parameters in the pipeline as below:
- SQLDWResume: Enter the URL from Logic App “Logic-App-SQL-DW-Resume”
- SQLDWState: Enter the URL from Logic App “Logic-App-SQL-DW-State”

- Add a Web activity and Name as SQL DW Resume
- Add an Until activity and Name as Until SQL DW Resumed
- Link Web Activity to Until Activity

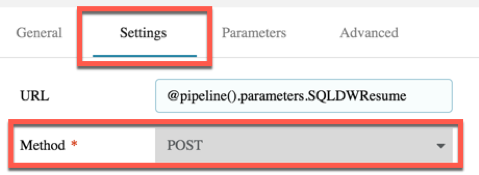
- In Web Activity, click on Parameters and in url add:
@pipeline().parameters.SQLDWResume

- Click on Settings and select POST in Method
- In Until Activity, click on Settings and in expression add:
equals(‘Online’, coalesce(activity(‘SQL DW State’).output.properties.status, ‘null’))

- Click on Activities and click on Add activity

- Inside the Until Activity, Add a Web Activity and a Wait Activity. Link Web Activity to Wait Activity.
- Rename Web Activity to SQL DW State
- Rename Wait Activity to Wait 30 seconds
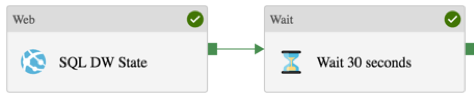
- In the Wait Activity, go to Settings and enter 30 on “Wait time in seconds”

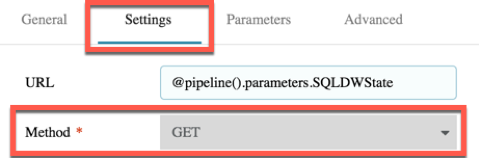
- In the Web Activity, go to parameters and in url enter:
@pipeline().parameters.SQLDWState

- Click on Settings and select GET in Method

- Now you can Debug your pipeline. Don’t forget to Publish it.

SQL DW Pause
Create a Pipeline and name it as “SQL DW Pause” and follow steps below:
- Create 2 parameters in the pipeline as below:
- SQLDWPause: Enter the URL from Logic App “Logic-App-SQL-DW-Pause”
- SQLDWState: Enter the URL from Logic App “Logic-App-SQL-DW-State”

- Add a Web activity and Name as SQL DW Pause
- Add an Until activity and Name as Until SQL DW Pause
- Link Web Activity to Until Activity

- In Web Activity, click on Parameters and in url add:
@pipeline().parameters.SQLDWPause

- Click on Settings and select POST in Method

- In Until Activity, click on Settings and in expression add:
@equals(‘Paused’, coalesce(activity(‘SQL DW State’).output.properties.status, ‘null’))

- Click on Activities and click on Add activity

- Inside the Until Activity, Add a Web Activity and a Wait Activity. Link Web Activity to Wait Activity.
- Rename Web Activity to SQL DW State
- Rename Wait Activity to Wait 30 seconds

- In the Wait Activity, go to Settings and enter 30 on “Wait time in seconds”

- In the Web Activity, go to parameters and in url enter:
@pipeline().parameters.SQLDWState

- Click on Settings and select GET in Method
- Now you can Debug your pipeline. Don’t forget to Publish it.

Get Tenant Id
To find the Tenant Id go to the page top right and click on Question and on “Show diagnostics”.

After downloading the PortalDiagnostics.json, search for tenants word and you will find the tenant id, as below:

Hope it helps you.
Thanks,
Sergio

Sergio,
thanks for the thorough post. It worked well for me!
Since azure keeps evolving from time to time, a couple of things worth mentioning:
* the URL for the Logic App can now be found by in the Logic App’s site by going to Overview -> Evaluation -> See trigger history->Callback url
* Unlike Jussi, Activity SQL DW State did work with a GET method
* when executing the pipeline, I came across the error “A valid body is required for PUT and POST requests”. I simply typed a blank (spacebar) in the body, and it worked.
Cheers
Thanks for article! Activity SQL DW State: I had to use method: POST to make it work (It didn’t work with GET). Note: It still has to be GET in the Logic-App-SQL_DW-State.
just type in single quotes instead of copy and paste
Hello,
I am getting the below error when executing the logic app
“error”: {
“code”: “AuthorizationFailed”,
“message”: “The client with object id does not have authorization to perform action ‘Microsoft.Sql/servers/databases/resume/action’ over scope ‘/subscriptions//resourceGroups/<resourceGroup/providers/Microsoft.Sql/servers//databases/’.”
any idea?
could you solve it ?, I have the same problem
Hi, thanks for the work you put into this. I am able to get most of the way through this but get this error when debugging. Any help would be greatly appreciated. Also, there does not seem to be a parameters menu in the web activity any more so I’m assuming the @pipeline().parameters…. goes in the headers or user properties fields now?
{“code”:”BadRequest”,”message”:”The expression ‘equals(‘Online’, coalesce(activity(‘SQL DW State’).output.properties.status, ‘null’))’ is not valid: the string character ‘‘’ at position ‘7’ is not expected.\””,”target”:”pipeline/xxxxxx”,”details”:null,”error”:null}
Thanks